
This is mostly what I've been up to this summer:

{best. movie. EVER!}
But as I swinging around Hobby Lobby and Target last weekend I finally felt inspired! Here's what I made:

First, I re-did my letter tile storage case with these awesome stickers I picked up at the Target Dollar Spot! I love how they have a picture and the capital/lowercase letter. Now I need to go find another case at Walmart for all my magnetic letters...

32 Compartment No Spill Case: Walmart, $7
Alphabet Stickers: Target, $1
Eureka Letter Tiles: Amazon, $9
{Total Cost: $17}
P.S. Don't forget to enter my current giveaway for a Target gift card! Giveaway ends this Saturday!

I finally tried it... mod podge cute clipboards for my awesome new teammates! Here's how it went- tell me I'm not the only one! :)

In the end (six clipboards and three trips to Hobby Lobby later) they turned out great! Practice makes perfect, right?! Here's what you'll need for this project:

Mod Podge Matte Finish: Hobby Lobby or Walmart, $5
Clipboard: Dollar Tree, $1
Scrapbook Paper: Hobby Lobby, $0.59/each
Assorted Foam Brushes: Hobby Lobby, $2/pack
Decorative Ribbon: Hobby Lobby, $1-$3
3" Avery Printable Round Labels: $9
{Total Cost: ~$20}


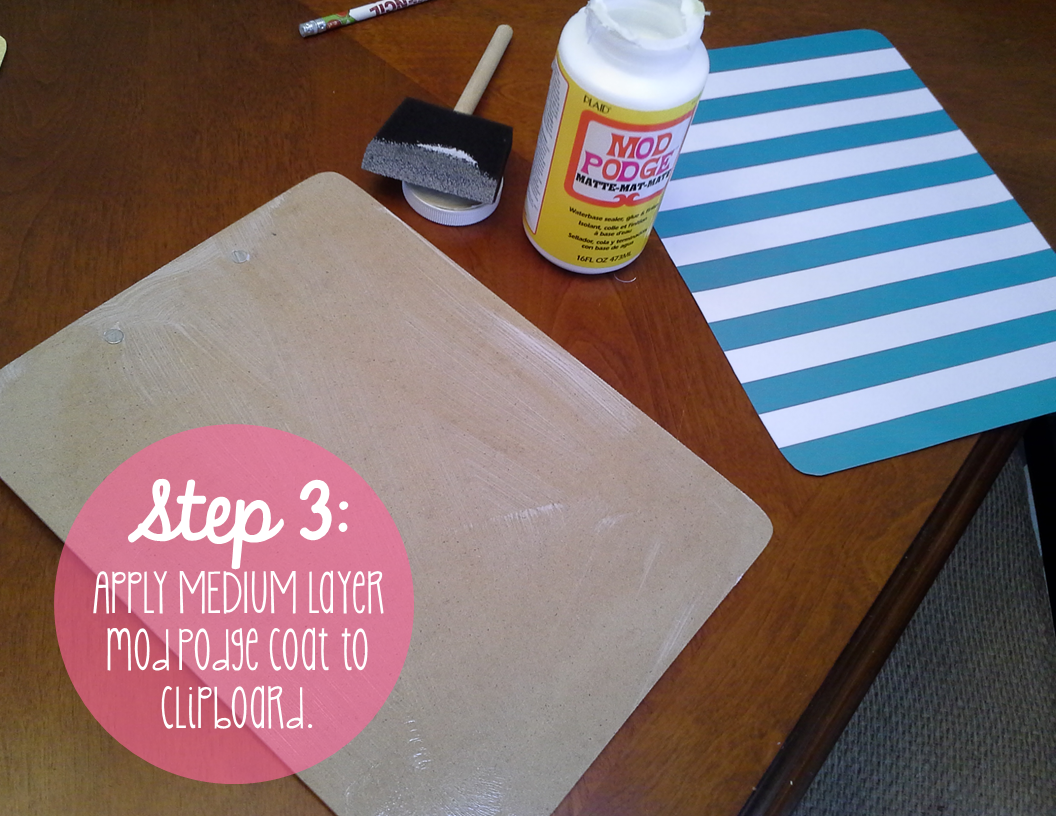
{It is really important to add a MEDIUM coat. This first time I didn't do a thick enough coat and my paper ended up peeling!}


{It's very important to WAIT between each layer of mod podge, otherwise you will get terrible bubbles. I did 3 total layers- 2 in the evening, 1 in the morning and they turned out great!}

Did I mention how important it is to wait for each coat to dry completely before putting on another one? :)

And last but not least...

I learned how to print onto sticky notes {best.thing.EVER!} Look how cute and classy my new organizational binder tabs turned out:

And it was pretty easy peasy lemon squeezy once I got going with it! Here's what you do:

Print sticky note template onto white paper, then cover with sticky notes. The template shown is for 3" by 3" sticky notes. Be careful to place the sticky part towards the top in each box.

Edit the text in the template file. The circles are designed for use with a 2" circle cutter or you can cut them out. You can also add text to the plain boxes to print onto an entire sticky note. (And yes, the text is upside down. This is very important- you want the sticky side on top to adhere to the page and the text to stick out of the binder!)

Place template paper with sticky notes into printer. Note the direction the sticky notes face- you want the paper feed in the smoothed down sticky part first.

Voila! Beautiful sticky notes. The lightly dotted circle makes it easy to line up with your circle punch or to follow with scissors.

Got that? Here's the steps in review:

And that's all folks! I hope you found some fun easy to use ideas. Don't forget to pick up your sticky note template/tutorial freebie below and happy crafting!


Jessica, Thanks for stopping over. LOVE your blog too! I adore your clipboards.
ReplyDeleteUnbelievable ideas for kids’ education! You have awesome stuff for teachers at your website. For more inspirations for your preschool projects I suggest getting help from this cool website http://www.kidsfront.com/how-to-draw-pictures.html.
ReplyDeleteThank you for all the hard work you put into it. It's really shows. i read you all post i love to read your post and you work well.status for fb
ReplyDelete